Crafting a Wooden Gun Cabinet with Exquisite Details
A gun cabinet isn't just a storage unit; it's a statement piece that reflects your passion for firearms and the craftsmanship you admire. This comprehensive guide will walk you through the process of creating a wooden gun cabinet with intricate details, transforming it from a functional necessity into an heirloom-quality masterpiece.
Planning the Project: Blueprint for Beauty
Before diving into the woodworking, a meticulous plan is essential. Consider the following factors:
Design and Dimensions
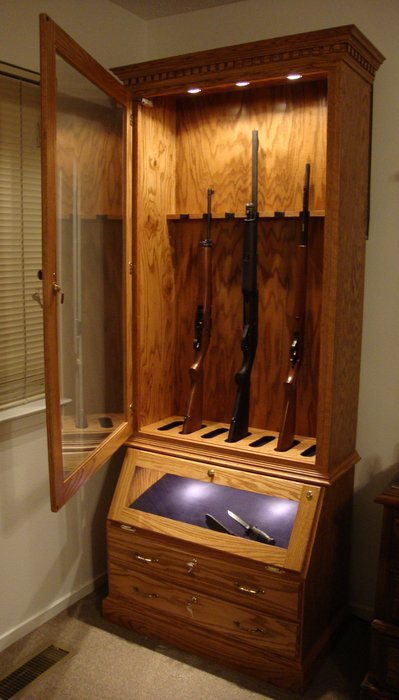
Style: Choose a style that complements your home decor, whether it's rustic, contemporary, or traditional. Size: Determine the number of firearms you'll be storing and the overall size of the cabinet. Allow ample space between guns for safe handling. Features: Incorporate desired features like drawers, shelves, or a glass display area. Materials Selection
Wood: Choose hardwood like oak, cherry, or walnut for durability and a rich grain. Consider the weight and workability of each species. Hardware: Opt for high-quality hinges, locks, and handles that complement the cabinet's style. Finish: Select a stain or paint that enhances the wood's natural beauty and provides a durable protective layer. Tools and Equipment
Ensure you have the necessary tools for the project:
Table saw or circular saw Jointer Planer Router Sanding tools Clamps Drill Measuring tools Construction: Building the Foundation
The construction process forms the heart of the cabinet. Follow these steps:
Cutting and Jointing Lumber
Cut the lumber to precise dimensions using a table saw or circular saw. Joint the edges of the lumber to create flat, smooth surfaces for precise joinery. Creating the Cabinet Box
Joinery: Choose from various joinery techniques like mortise and tenon, dovetail, or biscuit joints, depending on your skill level and desired aesthetic. Assembly: Glue and clamp the sides, top, and bottom of the cabinet box, ensuring a tight fit and square corners. Adding Interior Features
Shelves: Create shelves using dado joints or rabbit joints for a secure fit. Drawers: Construct drawers with dovetail or box joints for durability and ease of use. Glass Display: If desired, add a glass panel for a display area, ensuring a secure mounting system. Building the Doors
Frames: Construct the door frames using similar joinery techniques as the cabinet box. Panels: Add panels for strength and aesthetic appeal, using a variety of techniques like raised panels, recessed panels, or simple flat panels. Adding Exquisite Details: Elevating the Craft
The details are what truly set your gun cabinet apart. Here's how to incorporate them:
Intricate Molding and Trim
Router Work: Use a router to create decorative moldings around the cabinet edges, door frames, or drawers. Profiles: Experiment with different molding profiles for an elegant look, such as ogee, cove, or bead molding. Decorative Hardware
Handles: Choose handles that complement the cabinet's style, from simple knobs to ornate pulls. Hinges: Opt for high-quality hinges, such as concealed hinges for a clean look or decorative hinges for a more traditional touch. Locks: Select a secure lock that protects your firearms, perhaps incorporating a key-operated mechanism or a combination lock. Inlays and Veneer
Inlay: Create intricate designs by inlaying different wood species, creating unique patterns on the cabinet doors or panels. Veneer: Apply a thin layer of decorative veneer to the surface, adding visual interest and depth. Finishing Touches: Perfection in Detail
The final stage transforms your cabinet from a blank canvas into a breathtaking masterpiece.
Sanding and Refinement
Sanding: Smooth the cabinet's surfaces with sandpaper, progressing from coarse grits to fine grits for a flawless finish. Edges: Pay special attention to the edges, ensuring they are smooth and rounded for safety. Applying Stain or Paint
Stain: Apply a wood stain to enhance the natural beauty of the wood, choosing a color that complements the cabinet's style. Paint: If painting, choose a high-quality paint designed for wood surfaces, ensuring a smooth and durable finish. Topcoat and Protection
Topcoat: Apply a clear topcoat, such as polyurethane, to protect the finish and enhance its durability. Polishing: Polish the cabinet with a furniture polish for a high-gloss finish or a matte finish for a more understated look. Conclusion: A Legacy of Craftsmanship
Creating a wooden gun cabinet with exquisite details is a testament to your passion for both firearms and the art of woodworking. From the initial planning stages to the final polishing, each step requires meticulous attention to detail and a dedication to quality craftsmanship. The result will be a beautiful and functional storage solution that you can proudly display in your home, a lasting legacy of your skilled hands.


No comments:
Post a Comment
Note: Only a member of this blog may post a comment.