


Building a Compost Bin from Scratch: A Step-by-Step Guide
Hey there, fellow green thumbs! So, you're ready to embrace the world of composting, but maybe you're thinking, "Building a compost bin from scratch? Seems a bit daunting." Don't worry, it's actually easier than you might think. I'm here to walk you through it, step by step, with some tips and tricks along the way. We'll turn those kitchen scraps and yard waste into nutrient-rich compost gold in no time.
Choosing the Right Bin
First things first, we need to decide on the type of compost bin that suits your needs and space. There are a few popular options:
1. Three-Bin System
This is a classic, and for good reason! You have three bins (often made of wood or plastic): one for fresh scraps, one for actively composting, and one for finished compost. This system keeps things organized and allows you to easily rotate bins, ensuring even decomposition.
2. Single-Bin Composter
A single-bin composter is great for smaller spaces. They're often made of plastic or recycled materials and are easy to assemble. While they may require more turning than a three-bin system, they're still a solid option.
3. Tumbling Composter
If you're looking for a more hands-off approach, a tumbling composter is your friend. It's a rotating drum that allows you to turn the compost effortlessly. These are usually made of plastic and are great for smaller volumes of compost.
4. DIY Compost Bin
Ready to get creative? You can build your own compost bin using pallets, old barrels, or even wire mesh. This gives you full control over the size and shape of your bin, and it's a great way to repurpose materials. We'll be focusing on a DIY option in this guide, using readily available materials.
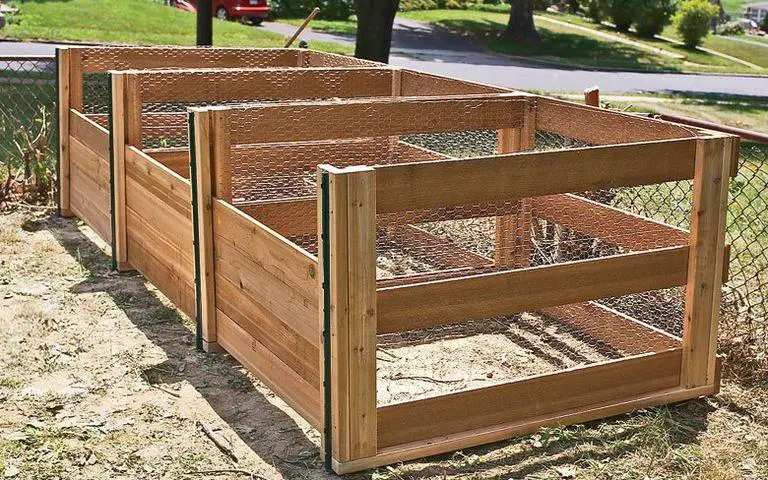
DIY Compost Bin: Let's Get Building!
For this DIY compost bin, we'll be using untreated wood (cedar or redwood are great choices) to create a simple, three-sided structure. Let's gather our supplies:
Materials You'll Need:
Step-by-Step Guide:
1. Mark and Cut the Boards:
Decide on the size of your compost bin (we'll go with a 3x3 foot bin for this example). Measure and mark your lumber boards for the sides. You'll need:
Use your saw to carefully cut the boards according to your measurements.
2. Assemble the Base:
Place two 4x4 posts on the ground, about 3 feet apart. These will be the corner posts for the base. Lay the two 3-foot boards between the posts to form the front and back sides of the base. Use screws to secure the boards to the posts.
3. Build the Sides:
Attach the third 3-foot board to the remaining two posts, creating a complete square base. Place another 4x4 post at each corner of the base, and screw them in place.
4. Attach the Back:
Screw the two 2.5-foot boards vertically onto the back posts, creating the back of the bin. Make sure the boards are level before securing them.
5. Construct the Top:
Attach the three 3-foot boards to the top posts, forming the lid of the bin. You can use hinges to make the lid openable for easier access to the compost.
6. Optional: Add Ventilation:
For optimal airflow, cut pieces of chicken wire or hardware cloth to fit the sides and back of the bin. Secure the wire with staples or wire ties. This helps prevent pests while allowing good ventilation for decomposition.
7. Place Your Bin:
Choose a shady spot for your compost bin, as direct sunlight can dry out the compost. Ideally, it should be close to your kitchen and garden for easy access.
Composting Tips and Tricks:
Now that your bin is ready, let's talk about the fun part: composting! Here's how to get the best results:
1. The "Brown to Green" Ratio:
For balanced composting, you need a good mix of "browns" (carbon-rich materials) and "greens" (nitrogen-rich materials). Aim for a ratio of about 2:1 (browns to greens). Here's a breakdown:
Browns:
Greens:
2. Layer Up:
Don't just dump everything in! Alternate layers of browns and greens for better airflow and decomposition. You can create layers 6-8 inches thick.
3. Keep It Moist:
Compost needs moisture to thrive. Aim for a damp, but not soggy, consistency. You can add water periodically to keep things moist, but avoid overwatering.
4. Turn It Regularly:
Every week or so, give your compost a good turn. This mixes the materials and helps to distribute oxygen for optimal decomposition.
5. Be Patient:
Composting takes time. Depending on the materials and your climate, it can take anywhere from 2-6 months for your compost to be ready. Just be patient, and soon you'll have nutrient-rich compost to enrich your garden!
Enjoy Your Compost!
Congratulations! You've successfully built your own compost bin and are well on your way to creating a sustainable and eco-friendly garden. Keep experimenting with different materials, and soon you'll become a composting pro. Remember, your garden will thank you for it! Happy composting!
No comments:
Post a Comment
Note: Only a member of this blog may post a comment.